Headphones Broken on One Side?
Complete Guide to Hinge & Headband Repair (Sony, Bose, Beats, JBL, Sennheiser, Gaming Headsets)
By Mad Lab Repair
Updated November 2025
If your headphones are broken on one side, dangling, cracked at the hinge, or the headband is splitting, you’re in the right place.
This guide explains:
- Why hinges and headbands break so often
- What you can safely check at home
- When DIY tape/glue fixes are okay (and when they’re not)
- Brand‑specific failure patterns (Sony, Bose, Beats, JBL, Sennheiser, gaming headsets)
- How mail‑in hinge repair works with Mad Lab Repair
Mechanical failures like these are extremely common on modern headphones – especially foldable, noise‑cancelling, and gaming models. Many manufacturers don’t repair them at all; they just push you toward buying a new pair or a paid replacement.
Mad Lab Repair exists to give those “perfect‑sounding but physically broken” headphones a second life.
On this page
- Who this guide is for
- What actually breaks when headphones are “broken on one side”
- Symptom → likely cause overview
- Step 1 – Quick checks you can safely do
- Step 2 – Diagnose by symptom
- Brand‑specific failure patterns (Sony, Bose, Beats, JBL, Sennheiser, gaming)
- Why tape and glue usually fail long‑term
- When to stop DIY and send them in
- How Mad Lab Repair’s mail‑in hinge repair works
- Brands & models we commonly see
- FAQ
- Next step
1. Who this guide is for
This guide is for you if:
- One ear cup is loose, dangling, or barely attached
- The hinge cracked, usually right above the ear cup or where it folds
- The headband is cracked or split, especially at the thin plastic area
- The headphones twist in a weird way and don’t sit straight on your head anymore
- One side is physically broken and now the audio cuts in and out when you move it
This is especially common on:
- Sony WH‑1000XM series (XM3, XM4, XM5)
- Bose QuietComfort (QC25, QC35, QC35 II) and Bose 700
- Beats Solo 2/3, Studio 3, Studio Pro
- JBL Live / Club / Tune over‑ears
- Sennheiser HD and Momentum lines
- Gaming headsets (SteelSeries Arctis, HyperX Cloud, Logitech G, Razer Kraken, Playstation / Xbox headsets)
Even if your exact model isn’t listed, the way these hinges and headbands fail is very similar.
2. What actually breaks when headphones are “broken on one side”
When you say “my headphones are broken on one side,” there are usually two layers of damage:
- Mechanical damage
- Cracked plastic at the hinge
- Split headband near the adjustment slider
- Broken swivel joint where the ear cup attaches
- Missing screw or broken metal bracket
- Electrical damage (secondary)
- Wires that run through the hinge/headband get pulled or snapped
- Result: audio cuts out, one side is silent, or sound works only at certain angles
On many popular models, the hinge design is a known weak point – thin plastic or small metal brackets carrying a lot of stress. Once that fails, it can tear the cable right along with it.
3. Quick symptom → likely cause overview
These patterns repeat across most brands and models:
- Symptom: One side physically dangling, but audio still works if you hold it in place
Likely cause:- Broken hinge or swivel piece
- Cracked plastic around the hinge
- Broken bracket or missing screw
- Symptom: Headband cracked at the top or near the adjustment slider
Likely cause:- Stress fracture in plastic or thin metal core
- Repeated flexing, big heads, or rough storage
- Symptom: One side has no sound, and moving the ear cup makes it cut in and out
Likely cause:- Cable inside the headband/hinge has been pulled, pinched, or snapped
- Symptom: Headphones sit crooked, don’t clamp evenly on your head
Likely cause:- Bent or cracked inner frame
- Hinge blown out on one side
- Symptom: Hinge or headband held together with tape, glue, or a 3D‑printed part… and still not right
Likely cause:- Underlying structural and wiring damage that quick fixes can’t handle long‑term
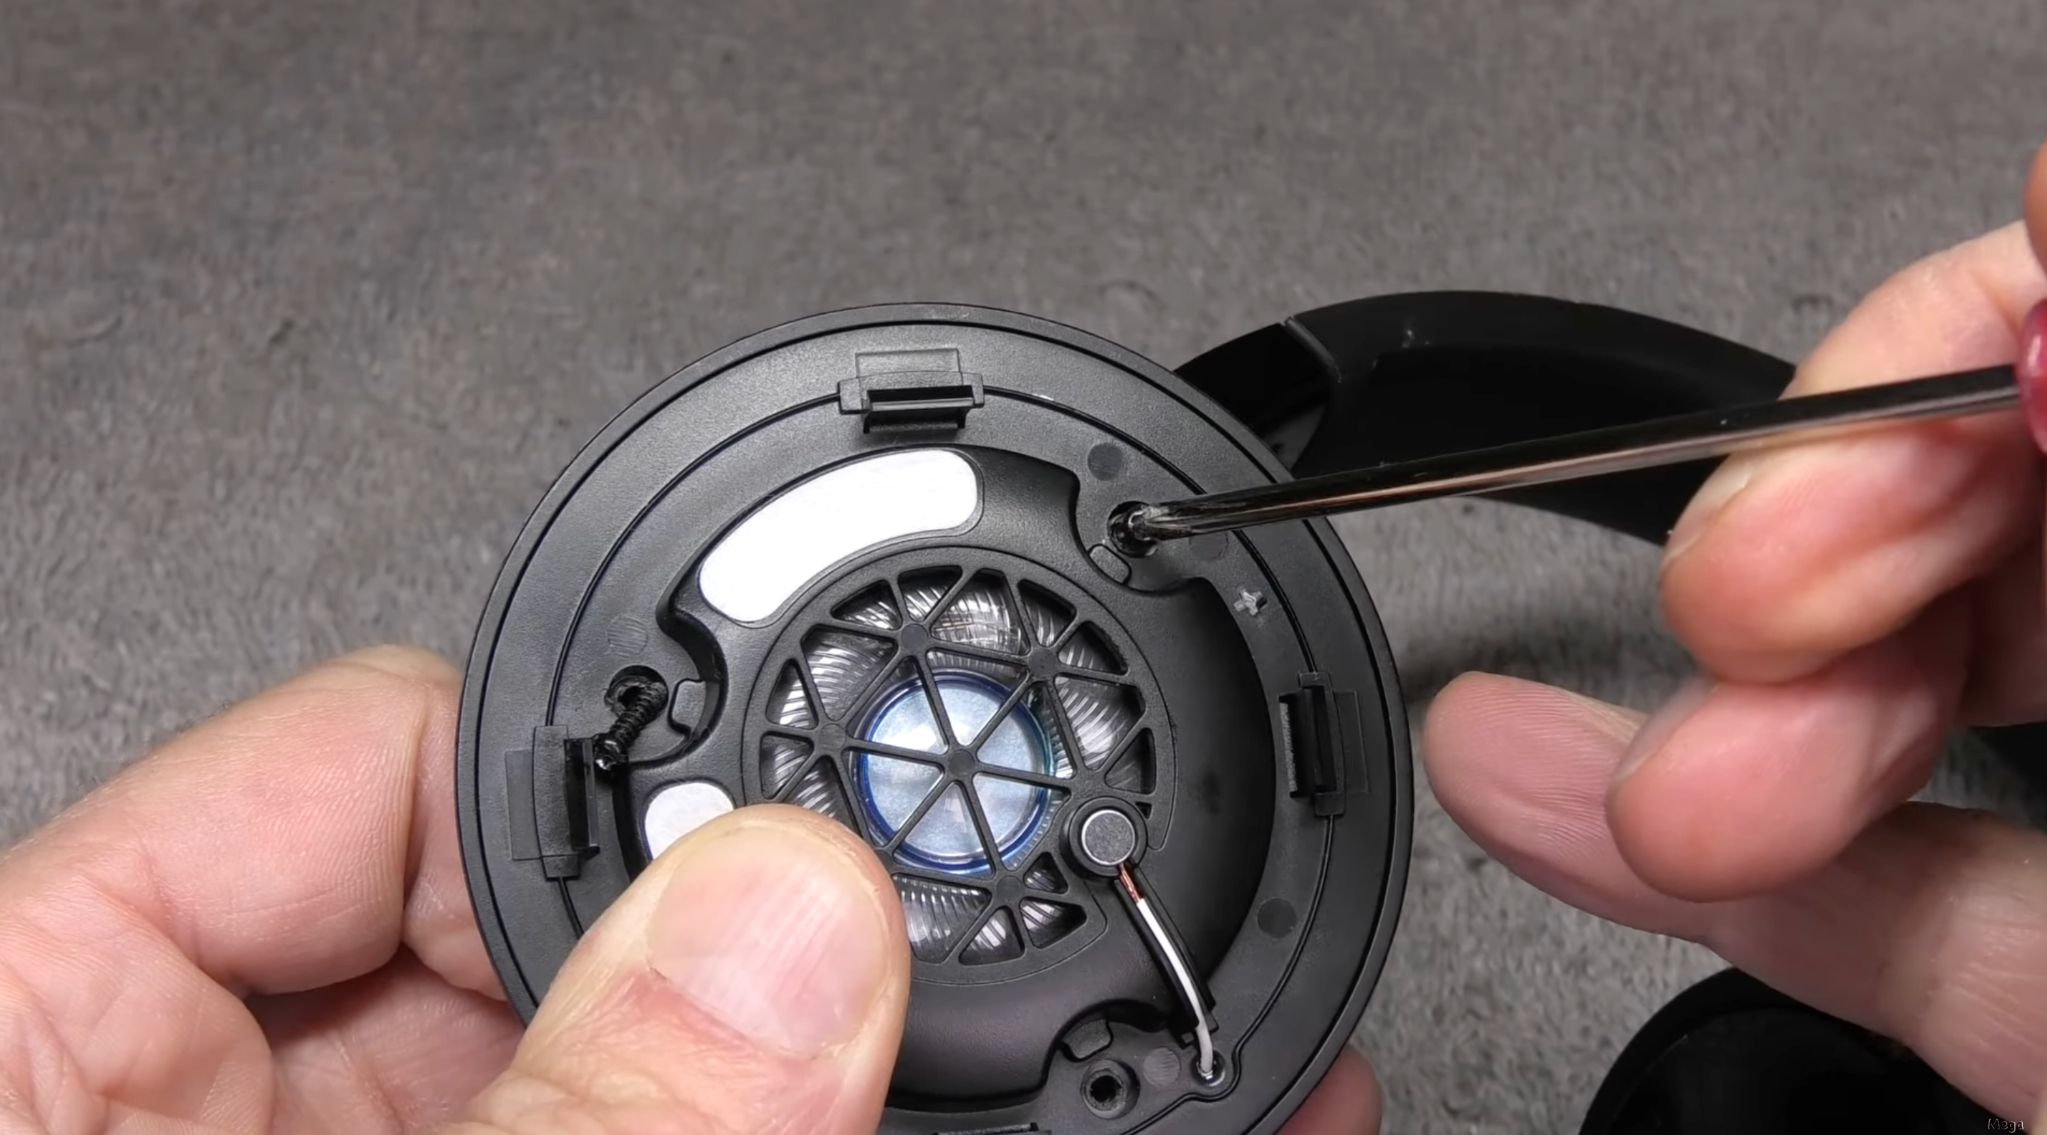
4. Step 1 – Quick checks you can safely do
These steps stay on the outside – no soldering, no risky disassembly.
4.1. Inspect the damage (without forcing anything)
Gently:
- Open and close the headphones
- Rotate and fold the ear cups like you normally would
- Watch the hinge and headband from the side
Look for:
- Hairline cracks in the plastic near the hinge
- Gaps that open and close as you move the cups
- Exposed metal arms or brackets
- Missing screws, caps, or decorative covers
If something looks ready to snap, stop forcing it. More flexing can finish the break or tear wires inside.
4.2. Test the audio on both sides
Before focusing purely on mechanical repair, check:
- Plug into a reliable audio source (or pair via Bluetooth).
- Gently move the broken side while playing audio:
- If sound cuts in/out as you move it → likely a cable problem inside the hinge/headband.
- If sound is totally fine, the damage may be mostly structural for now.
Note that even if audio still works, using a cracked hinge can eventually rip the cable, turning a simple mechanical fix into a more complex job.
4.3. Check for obvious loose or missing screws
On some models (Bose QC35/QC35 II, for example), screws in the hinge and swivel assembly are known to come loose or fall out.
If you see:
- An empty screw hole
- A screw about to fall out
…you can sometimes very gently snug it with the correct screwdriver – but don’t overtighten, and don’t use random screws that may be too long or wrong thread.
If the plastic the screw goes into is cracked, simply tightening the screw won’t fix it; it will likely break further.
4.4. Avoid “just bending it back” or twisting
If one side is crooked:
- Don’t try to “bend it back” into place with force.
- Modern plastic/metal composites often snap instead of smoothly bending.
Every hard twist at the broken area is a chance to finish off the hinge or tear the internal wire completely.
5. Step 2 – Diagnose by symptom
Once you’ve done the basics, you can usually tell which of these buckets you’re in.
5.1. Case 1 – Hinge or headband cracked, but audio still works
This is extremely common:
- The headphones sound fine.
- One side is visibly cracked or hanging slightly.
- If you tape it “just right,” it feels okay…for a while.
What’s going on:
- The structural part (hinge, headband, or bracket) is failing.
- The wire is still intact for now, but under extra tension as the structure deforms.
Short‑term, tape or a temporary brace may keep it together. Long‑term, every flex slowly saws at that internal cable.
This is the ideal time to send them for hinge/headband repair – before the wiring fails as well.
5.2. Case 2 – One side dangling and audio cuts in and out
Symptoms:
- One ear cup is loose or completely detached at the hinge.
- If you hold it in a certain position, sound flickers back on.
- Moving your head or bumping it kills the sound again.
What’s going on:
- The hinge broke or pulled apart.
- The cable inside that hinge has been stretched, pinched, or partially severed.
In these cases, proper repair usually means:
- Replacing the broken mechanical parts (hinge, bracket, or headband section).
- Inspecting / repairing / replacing the internal cable to that ear cup.
This is beyond what most people can do cleanly at home; it involves controlled disassembly, careful routing, and sometimes soldering.
5.3. Case 3 – Headband cracked at the top
You put them on one day, hear a crack at the top, and now:
- The band is split or showing a visible crack.
- The clamping force feels weaker or uneven.
- The hinge might still look okay for now.
This is well‑documented on several popular models, including Sony WH‑1000XM series and gaming headsets, where thin plastic at the top of the arc or near the slider takes a lot of stress. (
Short‑term fixes (tape, splints, glued brackets) can stabilize things but:
- Often look rough.
- Don’t always distribute stress correctly.
- Can fail again the next time they flex, especially on foldable designs.
Proper repair usually involves replacing or reinforcing the underlying structural part, not just covering the crack.
5.4. Case 4 – One side physically fine, but suddenly no sound
If structurally everything looks okay, but one side is dead:
- Try a different cable (for wired models).
- Turn ANC and Bluetooth off/on (for wireless).
- Check balance settings on your source device.
If you’ve ruled all that out and:
- One side is silent no matter what,
- Or sound returns only if you twist the headband slightly,
…there is likely a wiring break inside the headband/hinge or a driver issue. It may still be repairable, but this is more electrical than purely mechanical.
Mad Lab Repair can often handle both in one go if the mechanical area needs work anyway.
5.5. Case 5 – Hinge/headband already “fixed” with tape or glue
If your current setup involves:
- Duct tape
- Electrical tape
- Super glue or epoxy blobs
- 3D‑printed parts stuck on top
…it might be buying you time, but:
- The underlying fracture is still there.
- The plastic around it may continue to crack under load.
- The added stiffness in the wrong spot can transfer stress and cause a new break nearby.
For headphones you don’t care about, that’s fine. For $200–$500+ pairs you love, that’s where proper hinge/headband repair makes sense.
6. Brand‑specific failure patterns
Let’s talk about what tends to go wrong by brand.
6.1. Sony WH‑1000XM3, XM4, XM5 and similar Sony models
Very common patterns:
- Cracks near the hinge / headband junction, especially above the ear cup.
- Plastic fractures from normal use – taking them on/off, adjusting, folding.
- Hinge swivel piece snapping or separating from the internal bracket.
Typical results:
- One side becomes floppy or misaligned.
- Headband shows hairline cracks that slowly spread.
- In more severe cases, the ear cup nearly detaches on one side.
Proper repair usually looks like:
- Replacing the broken hinge/hinge swivel and affected plastic parts.
- Inspecting and securing the internal cable routing.
- Ensuring the fold/rotation still works smoothly without stressing the repair.
6.2. Bose QC25, QC35, QC35 II, Bose 700 and other Bose over‑ears
Common issues:
- Swivel hinge on one side fails – the ear cup dangles or separates.
- Small metal hinge parts or screws break or detach.
- One side suddenly feels loose and flops when you move.
Users frequently report:
- Being told to buy a new pair or pay for a replacement unit when they approach official support.
Proper repair generally involves:
- Replacing the metal swivel/hinge assembly or bracket.
- Re‑securing hardware with the correct screws and torque.
- Checking that ANC and wiring weren’t damaged in the process.
6.3. Beats Solo, Beats Solo 2/3, Beats Studio, Studio 3, Studio Pro
Patterns:
- Hinge or headband cracking near the folding joint.
- Pivot pins breaking or falling out.
- Headband fracture at the thin arch above the logo.
Because Beats are heavily folded, tossed into bags, and worn on the go, the hinge area takes a lot of beating (pun intended).
Proper repair usually means:
- Replacing the entire hinge or headband piece with a compatible part.
- Ensuring the repair doesn’t over‑stiffen the area and create a new weak point elsewhere.
6.4. JBL, Sennheiser (HD/Momentum), and other premium over‑ears
Typical issues:
- Cracks around the slider or size adjustment area.
- Hinge covers snapping off, exposing metal or wiring.
- Gaming/TV or travel use leading to lots of flexing and bending.
While each specific model is different, the story repeats:
- Thin structural parts + repeated stress = fractures.
- Internal wiring passes through the same high‑stress areas.
A proper repair focuses on restoring the structural integrity without interfering with the way the headband is meant to flex.
6.5. Gaming headsets (SteelSeries, HyperX, Logitech, Razer, Playstation/Xbox)
Common patterns:
- Cracked headbands from being stretched over time or yanked off quickly.
- Hinges failing where the ear cups swivel or fold.
- Integrated mics and chat controls making the cabling more complex.
Gamers often:
- Wear them for long hours.
- Drop them, toss them on desks, or catch cables on chairs.
Proper repair for gaming headsets can involve both:
- Structural hinge/headband work, and
- Careful re‑routing of chat/audio wiring.
7. Why tape and glue usually fail long‑term
Short‑term “field fixes” like tape, glue, and DIY splints are understandable. They can be okay as a temporary measure if:
- You just need to get through a short trip or deadline.
- You don’t care about looks.
- You accept that they might fail again.
Long‑term problems:
- Tape adhesive dries, peels, and slides.
- Super glue can make plastic more brittle around the crack.
- Globs of material can block the intended rotation/folding movement.
- None of these address the internal wire tension, which is often the next thing to fail.
If you love how your headphones sound and feel, investing in a proper hinge/headband repair is almost always the better play than “infinite tape.”
8. When to stop DIY and send them in
You should consider a professional mail‑in repair if:
- An ear cup is obviously hanging or nearly detached.
- There are visible cracks that grow each time you flex the band.
- Sound cuts in and out whenever you move the broken side.
- A screw or bracket fell out and you can’t reassemble it cleanly.
- Tape or glue repairs have already failed once (or more).
- The model is expensive or discontinued and you really don’t want to replace it.
At that point, the fix usually involves:
- Disassembling the ear cup and headband assembly correctly.
- Replacing or reinforcing the broken hinge/headband components.
- Repairing or replacing damaged wiring.
- Rebuilding everything so it opens/closes smoothly again.
That’s exactly the kind of work Mad Lab Repair is built for.
9. How Mad Lab Repair’s mail‑in headphone hinge repair works
Here’s what our process looks like for “broken on one side” headphones.
Step 1 – Quick online intake
You tell us:
- Brand and model (for example: Sony WH‑1000XM4, Bose QC35 II, Beats Studio 3, JBL, Sennheiser, SteelSeries, etc.)
- What happened (crack, snap, drop, normal use, etc.)
- Symptoms now:
- Dangling ear cup
- Crooked / twisted fit
- One side losing sound when moved
We confirm it’s a good candidate for mail‑in hinge/headband repair and give you simple packing guidance.
Step 2 – Safe shipping
Before shipping, you:
- Remove any detachable cables, dongles, or accessories (unless we ask you to include them).
- Fold the headphones carefully to avoid stressing the broken area further.
- Pack them in a small, padded box.
We can advise on shipping options that allow proper protection and insurance.
Step 3 – Diagnostic
When your headphones arrive, we:
- Inspect the hinge/headband damage in detail.
- Check the internal wiring, especially where it passes through the broken area.
- Test both channels (left/right audio) thoroughly.
- Decide what parts and procedures are needed to restore structural integrity and stable audio.
You’ll get a clear explanation of what’s wrong and what we recommend.
(We do not set any expectations on cost here — you always get a custom quote based on your exact situation.)
Step 4 – Repair & reinforcement
If you approve, we:
- Replace or repair the broken hinge, bracket, or headband component.
- Repair or replace damaged wires and connections as needed.
- Reassemble the headphones so the movement feels natural and not overly stiff.
- Test the fold/rotation and audio under normal use motions.
The goal is to get you back to:
- A solid, non‑wobbly hinge
- Symmetrical, comfortable fit
- Stable audio on both sides
Step 5 – Return shipping & aftercare
We:
- Pack your repaired headphones securely.
- Send them back with simple care tips:
- How to store and fold them
- How to avoid stressing the hinge/headband in the same way
You get your favorite pair back instead of shopping for a new one and hoping it sounds as good.
10. Brands & models we commonly see
Here are some of the headphones that frequently show up at Mad Lab Repair with hinge/headband issues:
Sony
- WH‑1000XM3
- WH‑1000XM4
- WH‑1000XM5
- Older MDR‑series over‑ears
Bose
- QuietComfort QC25
- QuietComfort QC35 / QC35 II
- Bose 700
- Other Bose over‑ear ANC models
Beats
- Beats Solo 2
- Beats Solo 3
- Beats Studio
- Beats Studio 3
- Beats Studio Pro
JBL & Sennheiser
- JBL Live and Club series over‑ears
- JBL Tune over‑ears
- Sennheiser HD series
- Sennheiser Momentum over‑ears
Gaming headsets
- SteelSeries Arctis series
- HyperX Cloud and Cloud II
- Logitech G Pro / G series headsets
- Razer Kraken and other Razer headsets
- Playstation / Xbox wireless headsets
If your headphones are in the same general family as these and are physically broken on one side, there’s a very good chance we can help.
11. “Headphones broken on one side” FAQ
Q: The hinge is cracked but everything still works. Should I wait until it gets worse?
A: You can, but once the crack spreads or the cup dangles, it’s more likely the internal wire will get stressed and fail too. Repairing earlier usually means less damage to undo.
Q: Glue and tape are holding… kind of. Is that okay?
A: As a temporary fix, sure. Long term, those materials don’t flex the same way as the original structure and often cause new cracks or wire strain. If the headphones are expensive or a favorite, proper hinge repair is the safer move.
Q: Can I just buy a replacement hinge/headband kit and do it myself?
A: Some people do, especially with widely documented models like Beats, Sony, or Bose.
Just keep in mind:
- You’ll need precision tools and patience.
- It’s easy to strip screws or damage cables.
- Misalignment can make the headphones feel weird or fail again quickly.
If that sounds stressful, a mail‑in repair might be better.
Q: One side has no sound but doesn’t look broken. Can that still be a hinge or headband issue?
A: Yes. The cable inside the headband and hinge can break without obvious external cracks. If sound returns when you twist the band slightly, that’s a strong sign of internal cable damage right in that area.
Q: Are hinge and headband failures covered under manufacturer warranty?
A: Many brands classify hinge/headband cracks as “physical” or “accidental” damage, especially if they happen after normal wear, and may not cover them under standard warranty. Some offer paid replacements instead of repair.
That’s why third‑party repair options exist.
12. Next step: get a real diagnosis on your broken‑hinge headphones
If your headphones:
- Are broken on one side
- Have a cracked hinge or headband
- Sit crooked or dangle
- Or cut in and out when you move them
…you’re almost certainly dealing with a real structural and wiring issue, not just a cosmetic crack.
You don’t have to guess which tiny bracket or cable is failing.
Mad Lab Repair specializes in mail‑in hinge and headband repair for:
- Sony WH‑1000XM series
- Bose QC and 700 series
- Beats Solo and Studio lines
- JBL and Sennheiser over‑ears
- Popular gaming headsets (SteelSeries, HyperX, Logitech, Razer, console headsets)
Tell us your brand, model, and what happened. We’ll let you know if it’s a good candidate for repair and how to ship it safely.
%20(6).png)
%20(7).png)